How to use Key Documents
Step-by-step guide to managing key documents in your salesroom
Learn how to add, edit, replace, or delete key documents in your salesroom to streamline team collaboration and efficiency.
You will learn!
-
How to add and organize key documents.
-
How to replace documents across multiple rooms.
-
How to delete documents safely.
Adding Key Documents
Key documents are team assets!
These documents are shared and editable by your entire team, making them a powerful tool for collaboration. You can add one or more documents directly to a salesroom.
Step-by-step:
-
Open the salesroom and click the “+” symbol.
-
Select Key Documents from the menu.
-
Choose one or multiple documents to add.
-
Rearrange or rename documents within the room as needed.
Replacing Key Documents
Pro Tip! Keep your documents up-to-date!
If you need to update a key document across multiple rooms, follow these steps:
Step-by-step:
-
Navigate to Key Documents from the main menu.
-
Click Replace next to the document.
-
Review the list of rooms where the document is used.
-
Confirm the replacement. Room owners will receive an email notification.

Deleting Key Documents
Step-by-step:
-
Navigate to the document in Key Documents.
-
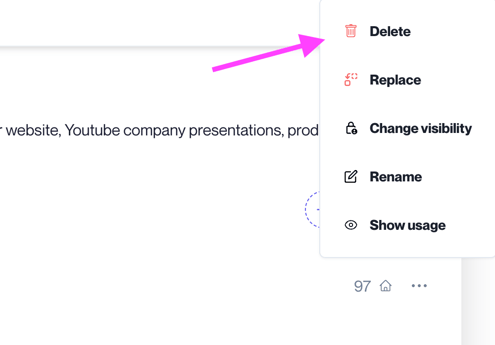
Click the three dots next to the document.
-
Select Delete.
This action ensures your document repository stays clean and up-to-date!
